A Gastroparesis “Vacation”

That is the first time I’ve typed the word “Gastroparesis” let alone said it in about a week. I didn’t blog about it, think about it, tweet about it or talk about it because I treated myself to a “Gastroparesis Vacation”. Friday was my birthday (no, I won’t tell you which one as a lady never discusses her age!) and because I’ve been feeling a little saturated recently my birthday gift to myself was a gastroparesis-free week…a vacation of sorts.

Can I tell you it was ABSOLUTELY, POSITIVELY, GLORIOUSLY FREEING and exactly what I needed! Now, anyone who even follows occasionally knows that I most certainly don’t live in denial about my life with gastroparesis. My “vacation” still included all the gastroparesis-friendly meals, exercise and “self-care” that I practice daily (and just so you know I wasn’t symptom-free during my “vacation”)-I just acted as if they were (are) a normal part of day to day life…because they are!

What my “Gastroparesis Vacation” did was take all the power away from my gastroparesis! For an entire week I refused to let it occupy the center of my Universe. I refused to allow it to define who I am. I refused to allow it to make me feel limited. I wasn’t stubbornly pretending that I was normal by eating and doing things that would make me sick and miserable nor was I lying to myself in any way. I chose to live my new normal as my normal…because it is my normal! I highly recommend this “vacation destination” as another stop along the gastroparesis journey!

As always Eat Well! Be Well! Enjoy!

PS Just in case you missed them- 2 good reads from the Twitter stream:

Are You Addicted To Suffering and Ready To Quit?

If-Then Thinking

I hope you find them as interesting and illuminating as I did.

The Little Tree That Could

I’ve been picking peaches all week. This has been a bumper crop and I’m still amazed that its been 15 years since a horribly misshapen, scrawny little twig rescued from a compost heap came to us unexpectedly one October afternoon. “He” was a cast-off from a friend’s father’s garden and literally came as a “Y”-shaped twig with a single root…no pot, no dirt. We planted our unexpected gift just as it was getting dark on that chilly October Sunday. The rest, as they say, is history.

Despite “his” unfortunate start in life and a shape that makes him innately weak and vulnerable to splitting, he has consistently produced peaches year in and year out as if “he” has no idea that “he’s” ugly looking and defective. Now, they’re New England peaches so they’re never really bigger than raquette balls, aren’t the freestone variety and are a little tart- which makes them perfect for cooking. I rely solely on the birds for pest control and nothing makes me happier than bringing in a tray of just picked, organic, sun-blushed peaches that fill the kitchen with their warm, sweet, peachy perfume.
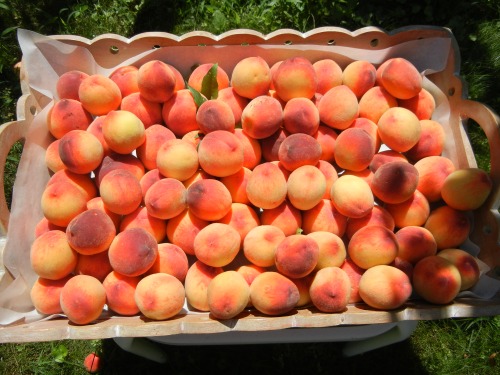
Last summer I was still getting my head around this new life with Gastroparesis. Backyard peach picking always signaled the start of Peach Crumble season. I spent days peeling and pitting pounds of peaches to be topped with generous fist-fulls of dark brown sugar, butter, oats and pecans then baked off in lasagne-sized pans and enjoyed by Hubby’s coworkers, neighbors and ourselves, of course. There were always a few crumbles destined for the freezer so that we could enjoy some of summer’s sunny bounty come cold days.

I had no Peach Crumble last summer and enjoyed the bulk of my peaches juiced but this summer has been different for as I learn more, do more and tolerate more I try more. This week there has been Peach Crumble of a sort. It may not contain all the butter, oats and pecans of previous years but I think it’s a perfectly peachy GP-friendly alternative. Oh, and by the way, our peach tree’s perfectly proportioned “siblings” have never produced nearly what our imperfect tree has accomplished!
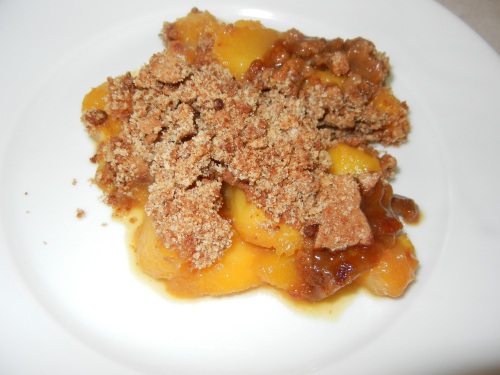
Gingersnap Peach Crunch

6 “normal” portions. This recipe is slightly higher in fat than the usual posts at approximately 5 grams per serving. This Crunch tastes of peaches-the ginger is subtle. For a spicier version feel free to add some extra ground ginger. Cooking the fruit before baking does two things: ensures that the peaches are fully cooked (aka GP-friendly) before going into the oven and uses a minimum amount of oven time during the hot summer months. Adapted from Food & Wine.

4 pounds peaches, peeled, pitted and sliced*

1/4 cup plus 2 Tablespoons dark brown sugar

2 Tablespoons fresh lemon juice

2 Tablespoons unsalted butter

1/4 cup plus 2 Tablespoons flour

pinch salt

1 cup coarsely crushed gingersnaps (used 60 Trader Joe’s Lowfat Ginger Cat Cookies for people)

Preheat oven to 400 degrees. Spray a non-stick skillet with cooking spray. Add peaches and cook over high heat until softened (about 10 minutes). Add 1/4 cup dark brown sugar and lemon juice and cook until juices get thick and syrupy and peaches are soft (approximately 5 minutes). Pour into a 10″ deep dish pie plate or 1 1/2 – 2 quart baking dish.

Meanwhile, pulse butter, flour, salt and remaining dark brown sugar in a food processor until the mixture resembles coarse meal. Add the gingersnaps and pulse just to incorporate.

Press the topping into clump and sprinkle over peaches. Bake 15-20 minutes until the top is browned and the filling is bubbly.

*My peaches are smaller than commercially grown therefore there are more pits. You may need less if your peaches are bigger.


Links Galore!

Anyone who follows along on Twitter knows that when I stumble upon something “good” I share it. Sometimes its an article relating to digestion, inspirational wisdom for coping with life’s challenges or food and recipe ideas. The great and not so great thing about Twitter is that the stream is ever flowing so some of the fantastic information I was excited to share quickly becomes just a memory. Here are just a few of my favorites!

A fantastic article about FODMAPS – Fermentable Carbohydrates that can cause bloating. Check out the chart at the very end of the article.

Clever Frozen Baby Food Treats – Easy, instant “sorbet-like” treats.

Super Easy Lasagne Roll-ups  – Just sub out the chopped tomatoes for sauce.

Frozen Hot Chocolate – 150 calories, a dose of calcium and a chocolate fix.

Smoothies 101 – Just omit any non-GP-friendly ingredients!

Foods You Can Carry On A Plane – Great ideas to inspire GP-friendly travel meals.

These are just the tip of the iceberg. So check in on Twitter periodically for a little pearl and stay tuned…easy Gingersnap Peach Crisp is the feature of my next post!

As always: Eat Well! Be Well! Enjoy!

Do Less. You’ll Live Longer.

Do less. You’ll live longer. That’s a piece of advice my Grandmother gave me a long time ago. Now, before anybody gets their knickers in a twist, “do less” does not mean “do nothing”. It is simply deciding exactly what things are most important then prioritizing those things. Everything else gets done when it get done…no guilt allowed!

Saturday was a “Do Less Day” at my house. Hubby had just put his mother on a plane back to Florida and I used the day to relax before playing catch up on Sunday. My “Do Less Day” included my morning speed walk around the neighborhood which, as my only form of “medication”, is absolutely, positively not negotiable and a healthy dinner…another “not negotiable”. Everything else waited for later. It was my day to recharge and refuel. Dinner was easy, delicious and nutritious straight out of the toaster oven!

So, in the spirit of doing less, recharging and refueling here is my super simple, “free form” recipe for Do Less Day Marinated Roasted Wild Salmon.

Do Less Day Marinated Roasted Wild Salmon

Serves 3-4. This is a “free form” recipe so all measurements are approximate. Tasty marinade additions are a few drops of toasted sesame oil or a small spoonful of good Dijon mustard…sadly, I’m allergic to both.

16 ounce wild Coho (Silver) salmon fillet*

Marinade:

thumb sized piece of fresh ginger, peeled and grated

2 cloves garlic, germ removed, peeled and grated

splash Ponzu Sauce (or Soy Sauce)-Ponzu is a citrus infused soy sauce.

1 tablespoon frozen orange juice concentrate

splash dry French white vermouth

Topping:

1 tablespoon dark brown sugar

salt and pepper

Combine marinade ingredients, pour over salmon and marinate for about an hour. Preheat oven to 400 degrees. Remove salmon from marinade and place in a baking dish. Sprinkle with dark brown sugar, salt and pepper. Roast until just cooked through-approximately 15 minutes.

*A few words about salmon. Personally, I consume only wild fish and seafood. Wild salmon is the term used for all varieties of wild caught salmon (Sockeye, King, Coho, etc). The fat content of salmon varies with the specific variety. Coho (Silver) salmon contains 7 grams of fat per 3 ounce cooked serving. Other varieties have varying fat contents with King being the highest at 11.5 grams per 3 ounce cooked serving and Pink the least at 4 grams . So, if you think salmon might be Gastroparesis-friendly for you keep in mind the fat content (and protein!) of each variety when shopping: Wild Alaskan Salmon Nutritional Information.

By the way, Grandma outlived all my other grandparents by at least a decade and had a longer life by decades than my parents. Just sayin’…she may have been on to something. Slow down. Do less. You’ll live longer.

Simple, Yet Sophisticated, Single Ingredient Sorbets

What if I told you that two cool, creamy and easy fruit sorbets were just a blend away?  That’s two sorbets with no peeling, pitting or poaching required? And the best part: no ice cream maker necessary! It’s true! Simple, yet sophisticated Pear & Peach Sorbet is that easy! All you need is canned fruit halves in heavy syrup, a freezer and a food processor or sturdy blender. Fruit packed in heavy syrup is what makes this recipe work as sugar syrup doesn’t freeze completely like juice. Avoid fruit packed in juice as it will yield disappointing results.

These sorbets are nice enough to serve as is or garnish with some very finely diced candied ginger, homemade or store bought berry syrup or diced canned pears or peaches for a little flavor alliteration. No matter how you scoop or serve  them these sorbets are keepers. And by the way, I’m happily eating candied ginger again. There was a time that even those fibers bothered me. It’s so nice to have a useful old friend back in my life.

Pear & Peach Sorbet

For best flavor allow sorbet to soften for approximately 5 minutes before serving

2 15-16 ounce cans pear or peach halves in heavy syrup

Freeze unopened cans of fruit for a minimum of 8 hours. Dip unopened cans in hot water for 20 seconds to loosen filling. Pour contents into the bowl of a food processor (I used my Vitamix) tearing at the filling with a fork to break up the pieces of fruit. Puree until smooth. Transfer sorbet to a covered container and refreeze. When ready to serve, remove from the freezer and let soften for approximately 5 minutes.

“Resistance is Futile”

No, I’m not a Star Trek fan but I catch myself using that phrase regularly and especially when talking about my life with Gastroparesis. It’s no secret I’ve come to appreciate the “path of least resistance”. Now before all you Sisyphus wannabes (those who get up every morning and push the same giant rock up the same steep hill only to watch it roll back down again) get yourselves in a uproar I’m in no way suggesting that the “path of least resistance” means giving in or giving up. For me it’s not wasting my energy whacking my head repeatedly against the same wall when I already know the result…a dented head and a headache!  It’s recognizing that which I have control over, acknowledging that which I don’t and practicing the fine art of living creatively within my limitations while still hoping for a cure. Yes, I do consider living my best life with a chronic digestive disorder an art and it requires letting go of what I had planned for life and getting creative within the confines of this life right here, right now. My reward for shifting my perspective…being well, feeling well, and doing well…within the confines of Gastroparesis. Please don’t get me wrong! I’m not cured, have good days and less than good days and I certainly don’t eat like a normal person (“Digestives” as Hubby and I have nicknamed them).

I routinely push myself to try new things…thoughtfully and cautiously. One of the biggest Gastroparesis-friendly things I’ve learned about myself is if it’s a fruit or veggie (raw especially) and it’s pureed to oblivion it’s most likely okay (for me!) provided I don’t do anything wild and crazy. My Green Smoothies were born that way as was my New Breakfast Smoothie below. My first post diagnosis experience with cantaloupe was just recently. I ate half a cup of very ripe cantaloupe and tolerated it okay…which means there was a little bloating. The second time I was up all night while it fermented in my tummy. Why am I doing this to myself? I asked when I already knew that I could consume three times as much if I just put it in the Vitamix and made a smoothie. The end result for me was more orange nutrients and less discomfort. How is that not a win/win? Sure, I missed out on the “experience” of eating cantaloupe but I also missed out on the unpleasant experience of fullness, bloating and a ruined night’s sleep.

My point is NOT that everyone should be pureeing their fruits and veggies! My point is that there are always creative solutions when one is faced with limitation and if one solution doesn’t work out don’t dent your head trying to force it to work. Spend that energy trying to find another. Recently, I had a follow-up appointment with my Gastroenterologist. It had been over a year since my first and only Botox treatment. He was sincerely interested in how I was doing on no medication and assuming the Botox had worn off long ago. I explained that daily exercise was my only “pill” and went on to tell him about eating six small meals per day, my Green Smoothies and this Blog (I regularly eat or use everything I write about here-eggs, chicken, fish, lobster, nut butter etc). The one perplexing question he asked was “But are you eating anything more challenging?”. I stifled all the sarcastic remarks that came to mind like “Oh thanks for reminding me! Friday is steak and broccoli night, Saturday is BBQ pork ribs with slaw night and Sunday is all you can eat donuts from Krispy Kream!” Thankfully, my face said it all for me because within an instant of asking he said “I assume feeling well is what’s most important to you.” BINGO!

My apologies for such a long post but I wanted to set the stage for my new breakfast smoothie…made with berries! I’ve gained eight pounds and no longer need to maintain my weight so a leaner, cleaner smoothie has taken my old smoothie’s place. So without further ado here is my New Breakfast Smoothie:

New Breakfast Smoothie (Kefir Berry Protein Smoothie)

I use blueberries and strawberries because they puree easily. I avoid unstrained blackberries and raspberries because even the Vitamix can’t pulverize the tough seeds to oblivion. This smoothie is “unsweetened” so feel free to adjust to your personal taste.  Makes one serving

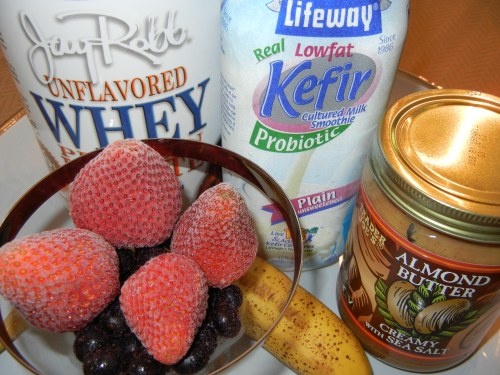
1/2 cup plain low fat or non fat Kefir*

1/2 frozen banana

1/3 cup frozen blueberries (wild usually)

handful frozen strawberries (about 4 large berries)

1 scoop unflavored whey protein isolate**

1 tablespoon almond butter

Puree until smooth and there are no flecks.

*Kefir is cultured milk and is also considered a “fermented” food. I use Lifeway Kefir without added fiber. It has a sour, cultured taste that is stronger than yogurt. It also contains 10 probiotic strains and 11 grams of protein per cup. Click here to read more.

**I now use Jay Robb unflavored whey protein isolate. It has 26 grams of protein per scoop and has no other additives. I do not purchase the flavored powders as they are sweetened with Stevia which I have discovered makes me dizzy! I participate in their auto ship program and get one shipment per month at a 20% discount with free shipping. Click here to read more.

What’s In Your Bag?

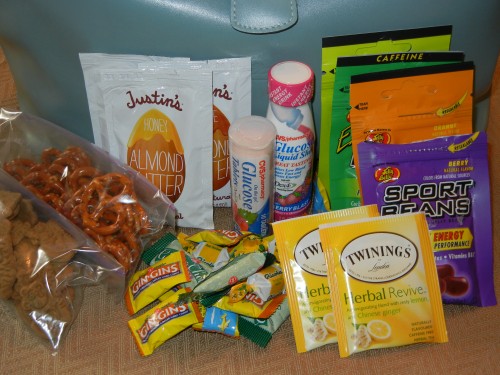
Hubby and I were relaxing in our local Starbucks when I reached into my bag for a little treat to go with my first iced coffee of the summer. I’m one of those petite women who carries a bag that’s twice as big (and heavy!) as she is and as I fished around and started to “unload” the Hubster laughed and asked “Exactly what’s in that bag?”. “Be prepared” isn’t just the motto of the Boy Scouts. So, here’s what’s in my bag:

1. Individual servings of almond butter (flavored with honey, maple and chocolate) are handy if I’m out and about and get caught without a snack. All I need to do is purchase a bagel, roll, crackers or other “vehicle” for my almond butter. No utensil needed just tear off a corner and squeeze out the almond butter. Sometimes I carry peanut butter pouches and Justin’s also makes chocolate hazelnut butter in an individual pouch.

2. Ziploc snack bags of mini pretzels and low fat ginger cat cookies from Trader Joes’s. I find rather than avoiding food, eating just a small handful of something crunchy and salty or crunchy and spicy (gingery) can actually make me feel better when my tummy is a little queasy and uncertain.

3. Glucose Tablets and a Glucose Liquid Shot in case of low blood sugar. I’m not diabetic and am diligent about eating 6 small meals a day but have had two occasions when I’ve had an unpleasant shift in blood sugar. I sat in my car and ate 6 hard candies until it passed but never want to get “stuck” in a situation like that again. I picked up this helpful tip from Crystal’s Traveling with Gastroparesis Video Blog Post. I haven’t had to use them but having the glucose products gives me a little extra peace of mind that I won’t be caught unprepared if another sugar shift is in my future.

4. Ginger tea bags for “tummy taming”. I can ask for a cup of hot water anywhere. I’ve been enjoying Twinings Herbal Revive Lemon and Chinese Ginger lately.

5. Jelly Belly Sports Beans. I’m not kidding myself, although these claim to be “quick energy for sports performance” they’re nothing more than glorified candy. What I do like about them is that they’re portioned into 100 calorie packs and contain carbohydrates, electrolytes and a few vitamins. Each resealable packet comes in berry, lemon/lime, watermelon (contains caffeine) and orange flavor. I found them completely by accident when I was browsing through the food items at REI Sports.

6. Gin-Gins, Ginger Chews and Ricola Lozenges. I keep a handful of Gin-Gins ginger hard candies and Ginger Chews from the Ginger People as well as Original Ricola lozenges. Between the spicy ginger and minty-herbal flavors I always have something soothing to suck on.

7. Peppermint Gum. Not pictured because I just chewed my last piece! I find chewing gum helps with the feelings of fullness. I’ve never been quite sure if chewing gum helps move the food along or just takes my mind off a full tummy but either way it makes me feel better after a meal that won’t “move”.

So, I’ve shown your mine…what’s in your bag?

As always…Eat Well! Be Well! Enjoy!

Snack Time!

Who doesn’t love Lipton’s Onion Soup Dip? I certainly always have and rumor has it that’s what Julia Child made a bee-line for at a reception for the Schlesinger Library at Harvard’s Radcliffe Institute for Advanced Study which happens to house a culinary collection of 15,000 books. So I’m in good company!

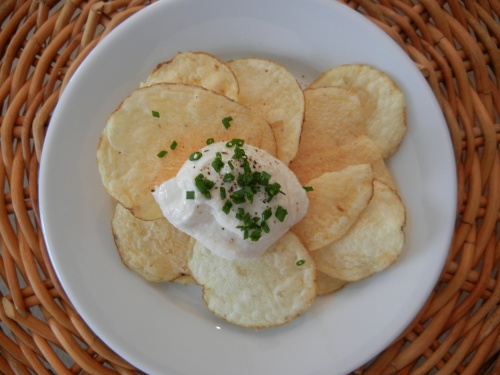
I enjoy two snacks a day and consume my fair share of Greek yogurt but there is only so much Greek yogurt with honey that this girl can tolerate. Sometimes I want a crunchy, salty, savory snack…but it still needs to be healthy. My favorite afternoon snack with a half ounce of baked potato chips is Protein Powered Onion Soup Dip enriched with the protein power of Greek yogurt. This dip hits the snack spot and provides 9 grams of protein!

My proportions yield a milder onion flavor. I use fat free Greek yogurt feel free to substitute 2% Greek yogurt for a creamier dip. As always the seasoning can be adjusted up or down depending on your preferences. Not only is this great as a snack but its a great new way to enjoy an old favorite while guaranteeing there is something potentially GP-friendly at your next BBQ or get together.

Protein Powered Onion Soup Dip

Makes 2 servings

1 6 ounce cup fat free Greek yogurt

2 teaspoons onion powder (or more depending on taste)

1 teaspoon Better Than Gravy gravy mix for beef (sold in a 1 ounce envelope)

freshly ground black pepper

finely snipped chives (optional)

Combine all ingredients and stir until smooth. Enjoy with baked chips of your choice. Pictured above with Kettle Brand Baked Chips sea salt flavor.

Go Ahead…Ask Me

As you know, I’m a trained chef who happens to have Idiopathic Gastroparesis. The past year and a half or so has been a journey of rediscovering how to do the two things I’ve always enjoyed…cooking and eating. But thankfully some things do stay the same. For instance:

As a general rule a fillet of fish baked at 400 degrees takes 10 minutes per each inch of thickness (at its thickest part) to be done and remain moist.

A perfectly hard cooked egg takes 10 minutes covered and off the heat once it’s come to the boil to prevent an unappealing green line forming around the yolk.

Homemade oven fries brown and crisp best baked on a dark sheet pan…even better if the sheet pan is preheated along with the oven first.

Green veggies should be dropped into salted boiling water and cooked uncovered to preserve their beautiful color…even if you need to cook them to death because of Gastroparesis.

Purees freeze best when they don’t contain white potato or milk products.

Simple syrup is simply equal parts sugar and water.

A turkey or chicken burger is done (and still moist) when an instant read thermometer inserted through the side of the burger reads 165 degrees.

These are all facts I know and routinely forget that I know. I also make assumptions that everyone knows how to make or do certain things in the kitchen. Just like most of you this way of living and eating is a new challenge for me but at least some of the old rules and guidelines remain the same. So, go ahead. Pick my brain. Ask me. I’m happy to share and in the event I don’t know the answer I’m happy to attempt to find one. So what are you waiting for? Go ahead…ask me.

Moist, Quick & Lemony

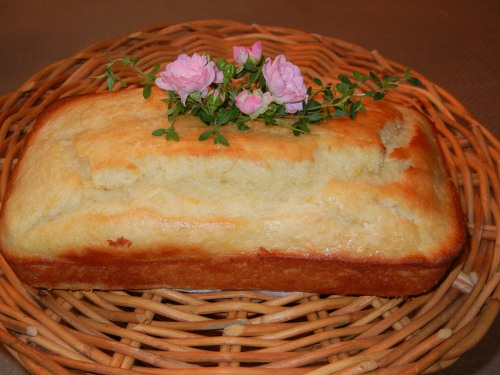
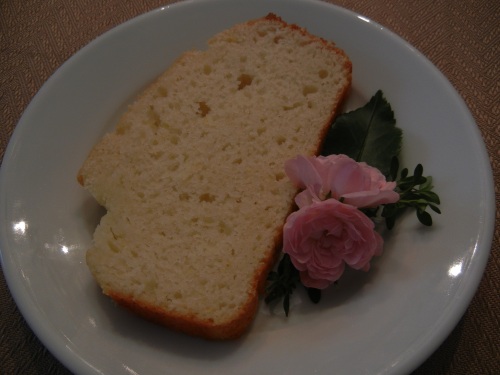
I love all things citrus and love cooking with buttermilk so imagine my delight when my friends at Eat Better America posted a recipe for Buttermilk Lime Tea Bread! I’ve adapted their recipe slightly by replacing the lime with lemon for a moist, simple tea bread with a light lemony flavor. Enjoy a slice as is or smear on a spoonful of seedless blackberry jam for an extra special treat. The folks at Eat Better America suggest mixing 1 tablespoon of sugar and 1 tablespoon of zest into a tub of spreadable cream cheese.

I can read your minds and they’re thinking: “Great, but what do I do with the other 3 cups of buttermilk in the quart because that’s the only way it’s sold?”. I’m one step ahead of you on that one! I plan on using the remaining buttermilk in Buttermilk Chive Mashed Potatoes-simply stir buttermilk and some very finely snipped chives (only if you think you can tolerate them), salt, pepper and just a touch of butter (again, whatever you can tolerate) into a batch of mashed potatoes. Next, I’m going to make Buttermilk “Fried” Chicken followed by Impromptu Buttermilk Ranch Sauce (for dipping oven fries and dressing baked potatoes) by mixing buttermilk, some fat free Greek yogurt, a squeeze of fresh lemon and a sprinkling of my favorite all-purpose seasoning Penzey’s Mural of Flavor…add some freshly grated Parmigiano Reggiano for even more savory flavor. Finally, because I know the little mouse I’m married to will polish off the tea bread faster than it took to bake it, I’ll be making Raspberry Filled Chocolate Layer Cake (such a keeper!). Any questions? Go get cooking!

Low-fat Lemon Buttermilk Tea Bread

Makes 16 servings

1 3/4 cups flour

3/4 cups sugar

2 teaspoons baking powder

1/4 teaspoon salt

1 egg

1 cup buttermilk

1/4 cup canola oil

2 teaspoons finely grate lemon peel

3 tablespoons lemon juice

1 tablespoon sugar

Preheat oven to 350 degrees. Spray the bottom and sides of a 9×5 inch pan and line the bottom with parchment paper. Mix flour, 3/4 cup sugar, baking powder and salt in a medium bowl. In another bowl mix egg, buttermilk, oil, lemon peel and 1 tablespoon of lemon juice until well blended. Add buttermilk mixture to flour mixture and stir until just moistened (there may be some lumps). Spread mixture in prepared pan.

Bake 50-60 minutes or until golden brown and a toothpick inserted in the center comes out clean. Meanwhile, mix remaining lemon juice with 1 tablespoon of sugar. Brush mixture over the top of the warm bread then cool in the pan on a rack for 10 minutes, remove bread from pan and cool an additional hour. When completely cool, wrap in plastic wrap. This bread is best served the next day.

Nutritional Information Per Serving: Based on 16 slices

130 calories, 4 grams fat, o grams fiber, 2 grams protein, 22 grams carbohydrate

Helpful Hints: For dark or non-stick pans reduce the oven to 325 degrees to prevent too much darkening. Also, remember, a plastic or metal washable ruler makes portioning a snap. This recipe makes 16 slices-keep yourself honest by measuring out the slices before you enjoy.